Pin It button on image hover
Showing posts with label Happy Flower's Day. Show all posts

Thursday, 30 December 2021

Magnolia you sweet thing by Rachel

 Hello there! Rachel here today with the last of my makes from November. This first one I really like - a little masking, stamping, watercolour painting and text ...what's not to like. I used the artist trading heart and the happy flowers day stamps.


In this last sample I used the Harmony tree stamp and created a scene around it using inks. 


Hope you have a fabulous New Years eve tomorrow - and all the very best for 2022!
Hugs
Rachel x


Monday, 27 December 2021

Kraft Magnolia and A Harmony Notelet Set (By Tracy Thompson)


This is my final post for this month and this year here on the Chocolate Baroque blog.  So the last of my creations from the Novembers shows, I love using Kraft card especially to colour on.  I stamped the Magnolia's from the Happy flower's day stamp set,   I coloured with Aqua Pencils, directly on to the Kraft card, but I didn't apply the water to the pencils as I liked leaving the strokes in there.  It was just that simple, but I love it!


Unlike the card above this notelet set isn't quite so simple.  I always start by creating the folder first, with a pocket on the inside to house the notelets and the envelopes..  I created the front using the Harmony Tree stamp set, distress oxide inks and the splatters from the  Numerology stamp set.  I coloured the tree with pencils, and added a ribbon.  I like to decorate the inside flap too, and I did that using the Remembrance Tree stamp set,  then as you can see using a selection of the stamps I have already mentioned I inked, stamped and created notelets and matching envelopes, all using the same method.

I hope you have enjoyed looking at my creations
Happy Crafting
Tracy x


Saturday, 18 December 2021

Gel Print Backgrounds by Natalie


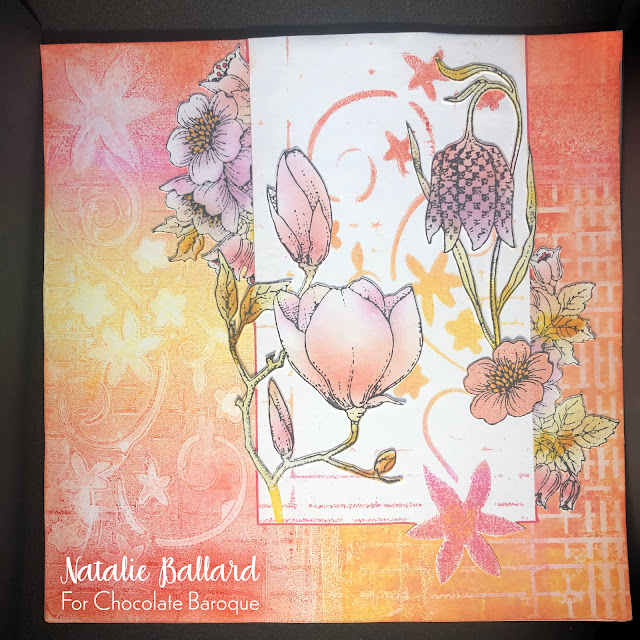
The sample above uses two types of gel print - both the positive and the negative. The positive image is pulled through your chosen stencil (or many stencils) and can be seen on the white area above. The negative is what is left behind after the positive pull and the removal of the stencil itself. The second pull was done directly onto my card blank. As I used Distress Oxide inks I didn't have to worry about warping either my card blank nor the paper of the positive pull. I'll often create multiple prints in a session so i don't always print with a particular layout in mind.

As the white section is cut from a separate piece, we can tuck in our floral images, and even play with which elements are in front on the piece and which tuck behind. Some of the floral images are stamped onto other gel prints (or offcuts of them, I never throw anything away). Others were stamped onto stamping card and blending brushes were used to softly apply ink using the same shades as the print. The florals at the back come from A Heart Full of Love and they are perfect for this kind of decorative element. The feature images are from the lovely Happy Flower's Day.

A card as lovely as this can do for many different occasions; when I make cards I tend to leave them without a sentiment until that moment they are needed. Sentiments are for the receiver rather than to reinforce the design in most cases, and, of course, there are those moments for which there are no words.

Friday, 17 December 2021

Autumn Time & A Subtle Butterfly (by Tracy Thompson)


Today I am sharing some more creations made for the November's shows.  For my first card I used Distress Oxides to make my background, simply by applying the ink to my glass mat, spraying with water and smooching my card into it.  I left the top right hand corner white to break it up a bit, and for a place to add my sentiment which is from the Harmony Tree set.  I stamped the large tree from the stamp set Trees A crowd, using some oxide I coloured in some grass around the base of the tree.


For this creation I did something a little different to my normal style, I really enjoyed playing with this technique which I was inspired to do after watching Lesley's workshop on shading with pencil.  So I started by stamping the Butterfly from the stamp set Happy Flower's Day  I shaded the butterfly using just normal HB pencils, then using a stencil and Distress Oxide inks in several colours created a background.  It's a very clean and simple card, but effective.

Thank you for allowing me to show you my cards, I will be back towards the end of the month with some more.

Thank you
Happy crafting
Tracy x

Sunday, 5 December 2021

Rainbows & Reflections (By Tracy Thompson)

 I would like to share a couple of creations I did for the November Craft Store shows


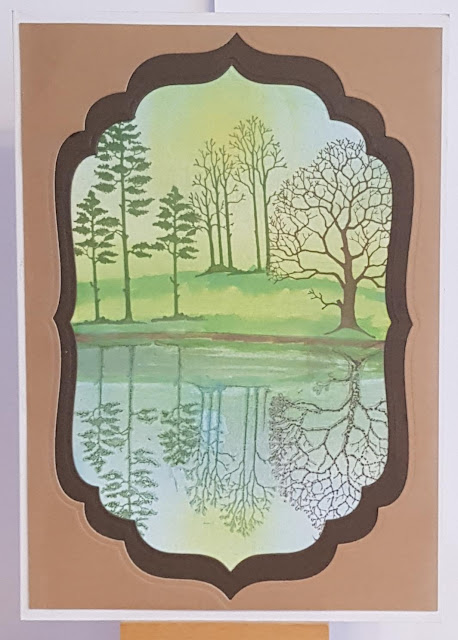
My first creation is all about reflection. I took the Trees A Crowd stamp set and selected some of the trees, I did a waterline so I could line my trees up, I used a gel plate to make the reflections, then I just built up the colouring creating the scene.  I die cut some frames to put around my images in contrasting colours.


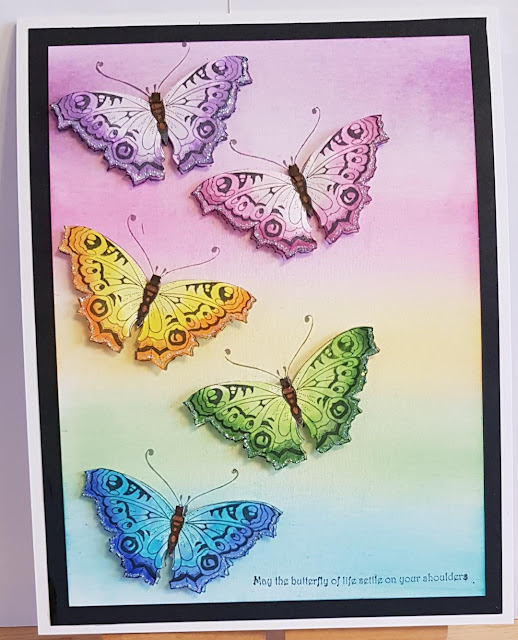
I loved creating this card, now I know it's not for everyone but I have to say I find fussy cutting relaxing.  So to start I chose five colours of Distress inks and then applied them with stencil brushes in  rainbow stripes.  I stamped five butterflies from the stamp set Happy flower's day, and cut them out.  Always cut your image before colouring it as the ink weakens the card and you don't get as crisper cut.  For each butterfly I took the colour from the background so for instance for the pink one I used Kitsch Flamingo, I then picked two other co-ordinating colours, Spun Sugar and Picked Raspberry to shade and colour the butterfly.  I then proceeded to do the other butterflies in the same way.
I stamped the butterfly image on the background where I wanted the butterflies positioned, then glued the cut out butterflies over the top with the wings free and shaped.  All I did then was added a sentiment from the set.

I hope to see you later in the month for some more of my samples from the shows.

Happy crafting
Tracy x

Friday, 3 December 2021

Hearts and Flowers (by Sandra)

Hello, I'm sharing some of my cards from the November show on The Craft Store.

My first card uses the beautiful Magnolia stamp from Happy Flower's Day. I stamped the magnolia in Memento ink onto smooth white cardstock and coloured with alcohol markers. I added a sentiment from the same set and some splatters from Numerology. 


My next card uses the Artist Trading Heart stamp set.  I stamped the heart with archival ink and carefully cut it out. I then stamped the butterfly from Happy Flower's Day into the heart and coloured with pencils. I blended some Distress Ink around the edges of the heart, going lighter towards the centre. I made a few light pencil marks on the card base where the heart would be placed and used the small leafy stamps from Filigree Trading Hearts to create a border around the heart. I added the number stamp and sentiment and then adhered the heart to the card with foam pads.

My next card uses A Heart Full of Love stamp set. I stamped this pretty image in Memento Ink and coloured with alcohol markers. I added a sentiment from Artist Trading Heart as I thought it very apt.


My last card to share today. I stamped this corner stamp from A Heart Full of Love using my stamping platform and Archival Ink. I then coloured with water colour pencils. I stamped the sentiment onto a die cut and mat and layered all pieces onto a 8x8 card base.

Thanks for looking

Sandra x

Wednesday, 1 December 2021

Happy December (by Judith)

Hello everyone, I hope you are keeping well. Many of you have been experiencing the cold weather lately, and it really feels like Winter has set in, doesn't it? I have just come back from a trip to Mexico, where it was lovely and warm, and the sunshine was very uplifting. I wanted to share a feeling of that sunshine with you with the colours that I have used in some of my projects today. I cannot promise to make you feel any warmer, but perhaps the cheery colours will brighten your day.

My first project was created by blending some Distress Ink onto a piece of Drawing Cartridge. I chose shades of blue and yellow throughout the whole project for continuity. I added some stencilling and stamped segments of the Small Graph Paper stamp using the stamp in my hand, not on an acrylic block, so that I could curve the stamp, to get smaller sections on the background. I also stamped the butterfly definition from the Happy Flower's Day stamp set on the background.

I stamped the large butterfly from the same stamp set first onto the background twice, and then again onto a piece of spare smooth white card. I coloured the images on the spare card using pencils, cut them out, and attached them to the background.

For my second project, I chose a piece of patterned paper and stamped the magnolia from Happy Flower's Day twice, masking the image as I went along. I added the flower definition and the main sentiment in the background. I coloured the image with pencils. I attached the panel to a chipboard panel using matte medium. When the adhesive was dry, I sanded the edges to give a white edge. 

My third project was created by placing Distress Oxides onto a craft mat and spritzing them with water. I placed the Drawing Cartridge onto the mat and picked up the colour. I used a whiteboard heart to do the same with the remaining colour on the craft mat, giving a paler version.

I stamped the flower definition over the background, and the fritillary flower and sentiment onto the heart. I picked up a bit of the Distress Oxide colour from the craft mat and painted the flower with a water brush.

For my final project, I chose to use grey card for a completely different look. I stamped the floral sprig from A Heart Full of Love around the edge of the background, and then added the floral heart in the middle. I coloured the images with pencils. I used white pencil first on the flowers, and added the other colours afterwards, this really helps on darker coloured card.

It's actually my Birthday today, and I would like to wish you all the best of days today. I will be back later in the month with more projects to share with you, take care, and thanks for stopping by,

Judith xx

Saturday, 16 May 2020

A Thought for You (by Judith)

Hello everyone, how are you all? I hope that you are keeping well during the lockdown, and taking good care of yourselves, especially if you need to look after other people at this time, or if you are feeling that life is getting a bit too much at the moment. Take time out for you if you can, and give yourselves a bit of TLC, a bit of time to craft, or simply to unwind doing whatever you enjoy doing for a little while.

I have made a card to send you a bit of cheer in my blog post today, to let whoever is reading the post know that I am thinking about YOU, and hoping that you are okay.

I have taken a piece of Textured Art card, which I coloured with Distress Inks and water. I then stamped the large Fritillary stamp from Happy Flower's Day three times, masking the first image before I stamped the image twice again. I coloured the image with Koh-I-Noor watercolour pencils, and added some water with a brush. I used lots of different colours on the flower, to create a blended final colour, which is a bit more natural than colouring with just one colour. I added some grey for shadows around the stalks and underneath the flowers.

A sentiment from the same stamp set completes the card.

Take care, stay safe, and thanks for stopping by,

Judith xx

Tuesday, 5 May 2020

sweetpea heart (by Veronica)

 This card uses a mix of stamps from the sweet pea blueprint and cornflower blueprint stamp sets.
I started by using the heart stamp from the artist trading heart set to create a mask and sponged round it with victorian velvet and dusty concord distress inks, then added more victorian velvet into the centre of the heart.
I stamped the blueprint from the cornflower set using the dusty concord ink, and then the smaller sweet pea image and the sentiment using versafine black. The flowers were coloured with watercolour pencils. The mat was white card coloured with alcohol marker to match the background.


My second card is from an earlier set of stamps, using the lovely magnolia from happy flowers day.
The background was created on a gelli plate, using distress oxide inks and brusho powders - I ended up with rather more water than I had intended on the plate, but thought the splodges went with April showers....
The magnolia was stamped using black versafine and clear embossed, then coloured with watercolours.
trimmed down to fit a white 6" square card blank and edged with alcohol marker.
I left it without a sentiment for now, as it will have one added  when I need a card in a hurry.
I do hope you are all managing to keep well and cheerful in these strange times, I find all the facebook live craft videos are great  - though if I watch them all I would never get anything done!- though I do make an effort to watch Lesley and David at 1.30 each weekday on the Chocolate Baroque  facebook group page, there have been some great demos and inspiration, and Lesley is currently doing a series talking about the varieties of ink pads available.


Friday, 20 December 2019

heart to hearts (by Veronica)


I was looking for something different to do with the artist trading hearts from Chocolate Baroque, and this is what I eventually came up with.   I made a hanging using two of the whiteboard hearts
along with a larger mdf heart that was an impulse buy at a local show held together by a folded strip of silver ribbon.

I have to admit to using brusho powders again, which made this quite a quick project to do if you didn't count the drying time....
The colours look rather different in the photograph of the finished hanging to those in the scans of the individual hearts, though the small hearts did end up noticeably bluer.

The larger heart was painted with gesso first and some stencilling with structure paste to give some texture, but the whiteboard ones were used just as they came. They were all sprinkled with a mix of black and grey brusho powders, sprayed with spray starch and covered with crumpled cling film then left to dry.
While they were drying I coloured a couple of sheets of white card similarly, but just using grey  this time.
 The magnolia flowers were stamped using black versafine ink onto the card and clear embossed, then fussy cut out and glued onto the hearts


Wednesday, 6 November 2019

Vintage Ephemera With an Added Cup of Tea (by Judith)

Hello everyone, I have a couple of vintage themed projects to share with you today using the stamps that we launched last month on our TV shows on Hochanda. These fabulous new stamps are so useful, and can be used with lots of your existing stamps, as you will see from the first project that I have created.

I coloured some drawing cartridge with some cold tea, and then sprinkled the background with sea salt, leaving it to dry. I brushed the grains of salt away, and then stamped one of the images from Baroque Ephemera 1 randomly over the background. I dry brushed some pale blue chalky paint over the top, to push the images into the background. I really like the blue and beige combination.

I stamped Floral Grunge over the top, using Archival Ink, and also stamped the flower head a couple of times onto  spare piece of background paper, also coloured with tea. I cut these out, and stamped the same ephemera image over the top, so that they look as if they had been stamped onto a piece of text. I decoupaged the images onto the background. I added some ricrac, also painted with the blue paint. I created a little tag by dry brushing a section of lolly stick with the paint, and stamping a word from Baroque Ephemera 2 over the top. A black brad and black card to mat the background complete the card.


I used some of the same background to complete my second card. I used the alphabet strip to create a frame around the edge. I added a postcard created by stamping onto another piece of the background, and adding a section of Movie Strip Collage in the corner. I added the lovely butterfly from Happy Flower's Day, and coloured both of these images simply with watercolour pencils and a water brush. I added tickets stamped from the ephemera stamp sets and some little stamps complete the card.

Both cards were a lot of fun to create, the stamps are great for building up backgrounds, and adding a little something extra to your projects. They can be mixed with your other stamps or create something special in their own right. I hope that you will enjoy playing with them as much as I have!

Thanks for stopping by,

Judith xx

Friday, 1 November 2019

Ephemera and Flowers

Hello,
I am sharing my projects from the Hochanda October show with you. This show featured the wonderful Baroque Ephemera stamp sets 1 and 2

With my first card I used a slotted die in which I could keep all my "memories".  I used the tickets, train sticker and receipts stamps. I aged them with Distress Inks.

For my second piece , I stamped the postcard and receipts. Again I aged them with Distress Inks and tied with some lace and added a die cut flower. I added the "Love Post" stamp from the Mail Art stamp set.

For this wall hanging I think I stamped everything! 
I started with an A5 size piece of greyboard and covered with gesso. I then stamped a background with one of the large stamps from Dusky Damask and the crackle stamp from Echoes from Italy .  I then ripped the stamped images of the receipts and edged with Distress Ink, added some tickets and a tag. I stamped the Butterfly from Happy Flower's Day  Added some splashes and drips of ink to finish.


My last two cards are from Floral Grunge and Movie Strip Collage.
Both cards were made by spritzing Distress Inks on a craft mat and then stamping with Archival. I then colourd the images with the same colours I had used for the backgrounds.

Thanks so much for looking
Sandra xx

Sunday, 27 October 2019

hearts

 I loved the idea of the artist trading hearts, and simply cut
 round the stamped images to make my own.
For the first one I used the  geometric trading hearts set, stamped in black versafine and clear embossed onto a piece of card coloured with brusho powders. I added more colours using distress markers, then the sentiment from artistic affirmations stamped onto another piece of brusho-ed card.
 The other hearts were stamped using the outline from artist trading heart stamped onto leftover card colopured using the shaving foam technique. I used the magnolia stamp and added a little extra colour using watercolour pencils, and then the sentiment.
The final one uses the butterfly from the same set, cololured with koh-i-nor watercolour paints.


My final sample is a canvas board that didn't come out as I intended, but was interesting all the same... The board was pre-gessoed, and i sprayed it with some elderly glimmermist sprays in green and silver after painting with some pale blue emulsion. I added some texture paste diagonally acoss , then stamped the hearts from the geometric set into the wet paste - I think I should have left them until the paste started to dry before removing them as i got a very blurred image. Sprinkled some copper embossing powder over the wet hearts , then more spray once it was dry.
Words in white are from a stencil using gesso, and the geometric heart was stmaped and embossed onto a leftover piece of card coloured with brushos. The arrow and the words were stmape din black nto white tissue paper and added using mod podge In hindsight i should have stamped in a brighter colour, as they vanish into the backgroumnd.


Saturday, 12 October 2019

More Flowers (by Magda)

Hello,
I would like to encourage you to use the new "Happy Flower's Day" stamp.  I had a lot of fun using this new plate from Chocolate Baroque and I share with you 3 Cards and a Tag.

Two of the cards have a layered stenciled background, coloured with Distress Ink pad, stamped images with Archival Jet Black and coloured with Faber Castell Art Grip Aquarelle Pencils

The white card has a coat of gesso on the stamped image and the texture is the result of random strokes done with a spatula.

The craft Tag is stamped with Versafine Vintage Sepia and coloured with chalk pencils.

You can find the sentiments on the "Words to Dazzle & Sparkle" plate.

I hope you like my projects and thanks for passing by.
Magda 


Thursday, 10 October 2019

magnolia (by Veronica)

  The stamps for the September shows were all lovely, but I am sharing my absolute favourite today , the magnolia from the the happy flowers day sheet. It is a large image, just perfect for colouring, and suitable for so many occasions - I never got round to making the sympathy card version.
Both of these card are 8" square, so that gives you some idea of the size of the stamp. very similar technique for both. The first version began with white card, spomged with distress oxide inks, mostly using antique linen and wild honey, with a heart shape masked off (I used the heart stamp to create the mask) after stamping the heart from geometric trading hearts. I randomly stamped the same heart stamp in the background using it hand held. The m   agnolia was stamped in versamark and white embossed before colouring with koh-i-nor watercolours. The sentimnent and butterfly were stamped with black versafine

The second card has a base of kraft card, stamped with various small wordstamps from the sets in the show, using vintage photo distress oxide ink, which was also sponged round the edges.
Magnolia again white embossed and watercoloured - the colours were those in the first card, but the darker base really makes them pop. The sentiment was also white embossed.

Sunday, 6 October 2019

Blue Butterfly (by Judith)

Hello everyone, I have a project to share with you today featuring stamps from last month's TV shows on Hochanda.

I have chosen to make a card using stamps from the lovely Happy Flower's Day stamp set, which is such a versatile collection of images. The flowers and butterfly are just delightful, and the script is incredibly useful to add as a background or embellishment. I think these are going to be a long time favourite of mine!

I started out by creating a background using the large butterfly, and stamping and embossing over a piece of drawing cartridge with white embossing powder and Versamark Ink. I added Brusho powder in Sea Green and Turquoise, then spritzed with water. I dabbed the background with a piece of kitchen towel to blend the background, and the butterflies acted as a resist for the vibrant colour.

I used the damp kitchen towel to colour a whiteboard heart, creating a much paler colour, which was exactly what I wanted. I then stamped the butterfly definition over the top using a green Archival ink. I stamped and embossed the butterfly once more onto a piece of coloured vellum, and cut it out, attaching it to the whiteboard heart. Finally, I used a piece of deep green card to mat the background, and pull everything together.

I will be back later in the month with more projects to share with you. Thanks for stopping by,

Judith xx